< Painting and Framing Calla LiliesJoin
In this free watercolor painting lesson, you will learn how to paint flowers called calla lilies in watercolor.
In the Beginning
To begin: Look to a standard frame size and work backwards to determine the paper size.
I like a 2 or 3 inch mat all around on my paintings for simplicity. I often use a double mat with the top mat about a 1⁄4” smaller. In this case, I chose a 2” mat.
I will first, accurately, cut my mat to finished size of the frame using a box cutter. I mark on the back of the mat board, the 2” all around. Next I remove the center, using my Logan mat cutter. For the 12 x 16 mat, I will now have my finished mat.
The watercolor paper for my painting will fit behind the opening in the mat with about an extra inch all around. This should make my watercolor paper size roughly 9 x 13.
I prefer ARCHES Watercolor paper.
Now to prepare the paper.
There are many methods to accomplish this. Sometimes I will submerge the paper in a deep sink/bath tub or even a plastic tub used for wall-papering.
I like to lay the paper on a bath towel to absorb the excess water and then quickly mount the paper to a board using staples. I let the paper TOTALLY dry on the board.
My "board" has been prepared and I have used it for many years. I purchased this board at the Home Lumber yard. I then painted both sides of the board using a quality paint sealer. My favorite method is to first mount a dry paper to my board.
At this point I like to do my drawing. Then, with a wet, natural sponge, I saturate the paper, spreading the water with the sponge. This method will remove any imperfections in the paper. I sometimes mount the wet paper very quickly because the paper will stretch a lot during the mounting process. I let it dry until the next day. For tiny paintings, I will just mount the paper to a Field Board using masking tape. Then sketch.
Whichever method I use is based on the final look I want for my painting. For wet on wet, the paper will be very wet when I put paint on the paper. Mostly, the paper will be totally dry before paint is on the paper. Dry paper will prevent a BLOOM which is quite impossible to eliminate. At any rate, I sketch only on dry paper.
Preparation for Painting
The beginning of all work is to decide on your topic and what you want it to look like as a finished product. This process will usually determine the finished size. I wanted this watercolor painting to be on the smaller scale, so I chose 12 x 16 as its finished size.
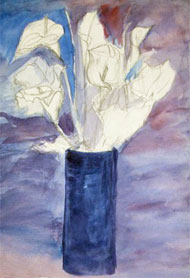
At this time, my paper is mounted and dry and my sketch has been completed using #2 pencils. Using a large brush, I start with the background to get color on the paper.
Determine which side the light will come from. Remember that shadow is the action of light. Don’t be afraid to use color. I use several colors on my brush at the same time since all things are made up of its own color plus reflected colors. You will use many layers of paint on your finished painting.
Painting from Background
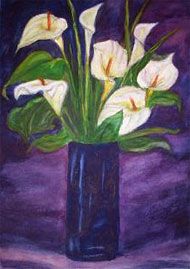
This painting is of the calla lily in a vase, and I found it a beautiful subject for Valentine’s Day.
Start with painting the background to create the mood. I use bold strokes here and simply let the color go where it wants to go within its space, even though the light side will show light paint interspersed with a bit of dark. I chose a dark background for the white flowers to give them the attention of the viewer and a position of prominence.
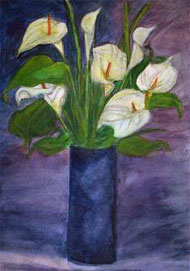
Painting the Vase and Flowers
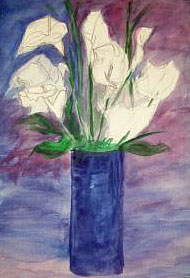
Next, I paint the vase. I must think about which direction the light would come from. This is important here for shadows and highlights on the vase. I can paint the entire vase and quickly remove spaces for highlights with a dry brush. I usually do not cover the highlight areas with dark pigment, since this can be difficult to remove. This area will need a lighter coloration on the highlight space. Remember to do this part with soft edges only. Watercolor is easy to blend to make soft-edges.
After the first background layer is painted, I will paint in the green leaves and filler materials. The second layer of background color now will be more accurately finished. Now again, firm out the leaves and stems. At this point, I would shade and paint highlights on the flowers.
White objects are usually painted carefully using Payne’s Gray because it is wonderful for shadows. This color can be extremely dark or very light by adjusting the amount of water used.
Finishing Touches and Framing
The painting is just about finished and only needs some finishing touches.
The completed painting is ready for framing. The frame and glass must be very clean. I use a hair dryer for this purpose. I tape the dry painting to the acid-free mat using paper tape purchased from the bandage section of a pharmacy. This tape is acid-free.
I now insert the painting into the frame and use an acid-free backing of foam core. I like to use very small nails to attach these to the frame. I then spread a paper-glue around the edges of the frame with a butter knife. A brown paper layer on this glue makes the back of the frame more attractive. Leave the frame lying flat until the glue is dry enough. Lastly, trim the paper with a safety razor.
Screw the hardware (eyes) for the wire, 1/3 of the way down on each side of the frame. Attach the wire to the hardware. Clean the glass again. Your watercolor painting of calla lilies is now finished.
This free watercolor lesson is provided by fellow artist and friend, Mary Churchill