< Simple Watercolor for a Gift Card Join
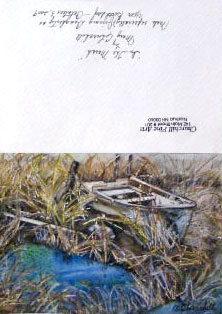
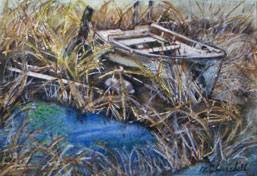
In The Marsh
Made for Jimmy Dougherty
For his birthday October 3, 2007
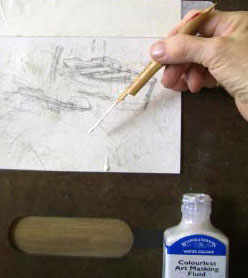
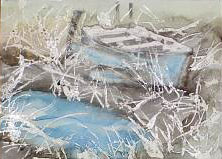
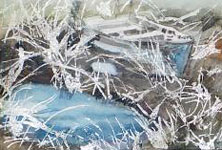
I found the tangle of reeds a challenge to paint. Therefore, I used masking fluid to isolate the reeds. After the mask dried, I painted the negative areas. I painted a few layers and let them dry. Next, I removed the masking fluid and painted the positive areas.
- Remove Masking with eraser quickly and easily.
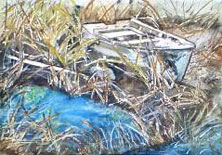
- Now paint positive spaces.
- Finish work on all remaining spaces.
- Mail. I enclose card into its envelope and address and seal it. This is enclosed in a large manila envelope, with an 8” x 10” acid- free mat and same size piece of watercolor paper. The watercolor paper will protect the watercolor (card) painting from acid products.
- Be sure to tape the outside of the manila envelope before mailing.
Supplies
PAPER
Watercolor paper cut to 5 ½ x 8 ½
Envelope: Invitation Envelope No. 5 ½ … 4 ¼ x 5 ½
OR
Blank Cards: Strathmore Watercolor Cardstock package with envelopes.
PAINTS:
Cobalt Blue
French Ultramarine Blue
Turquoise Green
Black
Burnt Siena
Cerulean Blue
(Red) Alizarin Crimson
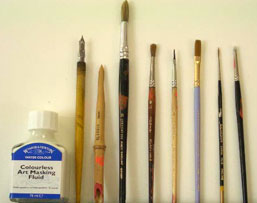
BRUSHES:
# ¼” Lettering (Plaid brand)
# 11 Round
# 4 Round
# 50 / 0 Small Round Scrubber (Use this only when necessary to gently remove unwanted paint from the paper.)
OTHER EQUIPMENT:
- Art Masking Fluid (colorless) Winsor & Newton
- Nib & Penholder OR Bamboo “Pen” to use with Masking Fluid. When finished using this tool, you must submerge it in water to remove masking fluid for cleaning.
- #2 Pencil

Drawing and Masking
Generally, I simply tape between the front and back of the card to the board, and then a two sided tape or rolled tape under the front edges, to the board. Or… Use tape to separate the front of the card from the back of card, using masking tape to create a clean edge between paper and painting.
Otherwise, I will not tape the card. I will paint flat on a table in order to paint to the edge. This can be a bit of a problem because watercolor paper tends to curl a bit when wet. I have at times used a hair-dryer to prevent a curling incident.
Instructions
When the painting is complete, I might cut a mat, and foam-core for a backing, to enclose with the completed painting. I wrap these in brown paper which leaves the card in its envelope, signed and addressed, separate. I enclose these together in a brown envelope for mailing. The recipient will frame their card-painting, which is now a painting gift.
Most of the time, I will enclose only the mat and a same size sheet of watercolor paper for the back of the small painting. I used Arches watercolor paper because it is acid free. They will buy their own frame which needs glass. Size: 8 ½ x 10. Usually, a small frame will use its own frame backing and not need the Foam Core. They will tape the entire card on to the back of the mat with a Paper Tape from the Pharmacy. One inch Johnson & Johnson in the First Aid section. Mat, Foam-Core/ Watercolor paper sheet and Frame are all size: 8” x 10”. Mat opening: 4 12/16” x 6 9/16”.
We will need to soften many hard edges. I do that by first cleaning the paint from my brush. Now use the damp brush on hard edges in a gentle swirling action. It is important to gently soften and smooth edges. I often use a hair-dryer to dry the paint before I continue. I don’t always want paint to run and blend into each other, or to cause a Bloom which can’t be corrected. Watercolor usually needs a couple coats to give depth and richness.
And lastly…. Always keep your water and palette clean!
Painting
Draw reeds with Masking Fluid in thin strokes. If drops appear, blot with paper towel carefully. Let totally dry.
Once the masking fluid is dry (overnight perhaps), start painting everything. Let the paint dry and then put on another coat or two, drying in between each.
The boat is an extremely important part of this painting, pay close attention to all areas of it.
There is a rock to deal with and the excess water “pond” which needs to be painted carefully. The things that float on the water can be painted later… or now. When all areas are painted to your satisfaction and dry, you can use an eraser to remove the rubber mask. This will reveal the white, unpainted, areas. Now to paint the reeds slowly and with great attention with a thin brush. Remember that some reeds are dead, while others are more alive.
Sometimes, the adage “less is more” can apply in painting. Be careful to not make the painting too dark or over-loaded with the reeds.
Give yourself a day or two to let the painting totally dry, then look it over and make any changes you find necessary for your comfort.
This free lesson is provided by fellow artist and friend, Mary Churchill