< Watercolor Home PortraitJoin

In the summer of 2001, I was called for commissions for house portrait watercolor paintings for a few houses, I drew on location to explore composition possibilities and I took many pictures for reference. This stage in my painting process I call the stage of finding the excitement and inspiration. Sometimes I did paintings and color studies in plein air and then completed my final paintings in my studio.
The following is a sample of my painting process in steps.
Preparation
Materials used:
View info on brushes
9" x 12" cold-press watercolor block
#2B pencil
paints: Red, Yellow, Blue, Burnt Sienna and Burnt Umber
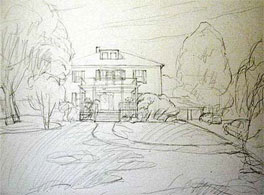
Step 1: Drawing in Location
The first step in the process was to visit the house and the people who live in it. After I learn stories of what makes this house special to them, the house becomes a home for me — a home with memories, a home that each family member wants to remember through the painting I am about to create. This first step is very important. It helps me to establish an emotional connection with my subject.
Step 2: Reference and Preparation
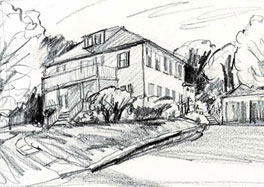
Next, I make several sketches of the location. I then take digital photos to capture the details for reference later as I work in my studio. Using the sketch and the digital photos, I make a detailed pencil drawing. After I finish with the drawing, I mix small paint samples on another sheet of paper to determine the colors I want to use for the portrait.
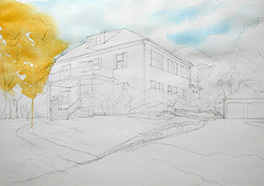
Step 3: Painting Background
To begin the painting, I stretched the paper on a wood board. I used my 1-inch flat brush to wet the upper portion of the paper (behind the house) with pure water for the sky and the tree area on the left.
While the area was still wet, I used my calligraphy brush with some blue mixed with water and brushed the paint into the sky area.
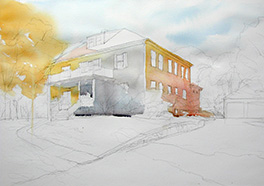
Step 4: First Wash on the House
I then applied yellow for the tree. Notice that I did not cover the entire area with yellow, but left some small areas untouched. These are the spaces where the sky will show through the branches.
When the sky area was dry, I started painting the front of the house. First, I applied some yellow color to the left side of the house, and washed the rest of the wall with a mixture of blue and burnt sienna. For the other side of the house, next to the red maple tree, I started from the left upper corner with yellow and added more and more red towards the lower right corner of the wall.
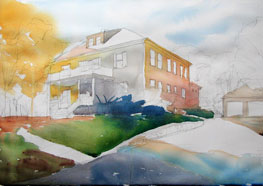
Step 5: Wash to the Rest of Painting
Before I moved my attention away from the house, I painted the dormer on the roof. Then I used a mixture of burnt sienna and red, washed into the area right under the yellow tree on the left, and then I mixed yellow with blue for the grass area.
I then worked into the bushes around the house and the driveway. Notice, I laid one color next another, so that they would naturally merge into each other. Sometimes I picked different colors in the body and the tip of my brush before I laid my brush on the paper to create a special effect.
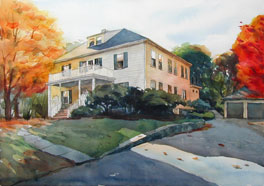
Step 6: Adding Details
I introduced the first layer of color to the green trees and red maple tree behind and to the right of the house. Painted the window-sidings on the front of the house and the reflection in the window glasses on the right side of the wall.
I used mixture of blue and burnt sienna to paint into the shadows on the driveway and a mixture of blue, yellow and a bit red for the area on the left under the yellow trees. Then I created the shadow on the rooftop.
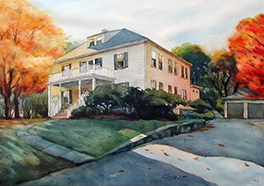
Step 7: Final Touch for Balance
I then proceeded to shape and add details to the bushes. Using a thin glaze, I created the details on the ground, the driveway, trees, the front door area and the siding. Finally, I used my 1-inch flat brush to lift pigment from the front yard area to create a soft effect for the shadows.
Then I used the calligraphy brush to add some brown and red dots to the front yard and the driveway. In this painting, I didn't use any masking fluid or any opaque white.